Forwarding Document in Printer's Memory to Shared Folder on Computer
You can forward the received faxes stored in the printer's memory to the shared folder on the computer as PDF files using the operation panel of the printer.
You can forward a specified document in the printer's memory to the shared folder on the computer or forward all the documents in its memory to the shared folder on the computer at a time.
 Important
-
Do not disconnect the printer with the computer when the printer forwards received faxes to the shared folder on the computer.
-
We assume no responsibility for damage to or loss of data for whatever reason even within the warranty period.
 Note
Note
-
Register the destination folder using Quick Utility Toolbox in advance.
For details on how to register the destination folder:
-
For Windows:
-
For Mac OS:
-
-
When forwarding a specified document, you specify it by its transaction number. If you do not know the transaction number for your target document, print the list of documents (MEMORY LIST) first.
-
After forwarding the fax in the printer's memory to the shared folder on the computer, the fax is still stored in the printer's memory.
For details on how to delete the fax in the printer's memory, see Deleting Document in Printer's Memory.
-
Make sure that printer is connected with destination computer.
-
Select
 Fax on the HOME screen.
The Fax standby screen is displayed.
-
Select Function list.
The Function list screen is displayed.
-
Select Memory reference.
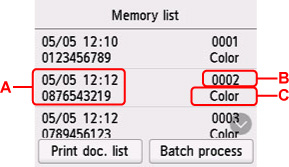
The memory list is displayed.

-
A: Date and time of transaction and fax/telephone number
-
B: Transaction number (TX/RX NO.)
A transaction number from "0001" to "4999" indicates a document being sent.
A transaction number from "5001" to "9999" indicates a document being received.
-
C: Color is displayed for color transmission/reception. Nothing is displayed for black & white transmission/reception.
 Note
Note- If no document is stored in the printer's memory, There is no document in memory. is displayed. Select OK to return to the previous screen.
-
-
Select a forward menu.
-
To specify a document to forward to the shared folder on the computer:
Select a document to forward on the Memory list screen, select Save specified document.
 Note
Note-
If the specified document is not stored in the printer's memory, There is no document that can be forwarded. is displayed. Select OK to return to the previous screen.
Select Destination folder as the destination.
Select a destination folder to forward the specified document to the shared folder on the computer.
 Note
Note-
When you specify a PIN code for a registered folder, a screen asking you to enter a PIN code is displayed. Entering the PIN code allows you to assign the shared folder as the destination.
-
-
To forward all the received documents stored in the printer's memory to the shared folder on the computer:
Select Batch process, and then select Save all RX documents.
Select Destination folder as the destination.
Select a destination folder to forward all documents to the shared folder on the computer.
 Note
Note-
When you specify a PIN code for a registered folder, a screen asking you to enter a PIN code is displayed. Entering the PIN code allows you to assign the shared folder as the destination.
-
-
 Note
Note
-
You can forward up to 250 pages of fax as one PDF file.
-
You can forward up to 2000 PDF files on the shared folder on the computer.
-
Faxes are forwarded according to the order of the transaction number when Save all RX documents is selected.
-
If the printer is disconnected with the computer or if the writing error occurs on the computer while forwarding faxes is in progress, the error message is displayed on the touch screen. Select OK to dismiss the error.
-
The faxes forwarded to the shared folder are named with the serial number from FAX_0001 (file extension: PDF).

